Thermal distortion in heat-exchanger internal components can lead to leakage, but several design measures can be taken to mitigate these concerns
Leakage of bolted flange joints results in additional costs at any facility in the chemical process industries (CPI), and poses significant operational, environmental and safety risks.
There can be many reasons for flange leakages, such as thermal shocks or differential thermal expansion of components, uneven bolt stresses, improper flange alignment, improper gasket seating, high vibration levels, incompatible materials and so on. Some of these causes can be rectified by properly selecting materials or using the correct assembly techniques. Some reasons, such as thermal shocks and high vibration levels, are direct results of operating conditions.
This article outlines a basis for identifying the thermal shock scenario in the girth flange joints of shell-and-tube heat exchangers and the design measures that can be adopted in mechanical strength calculations of flanges to minimize leakage due to thermal shocks in operational equipment.
Shell-and-tube heat exchangers are an essential part of any petroleum refinery or chemical processing plant. They are used to transfer heat energy across metal walls between hot fluids and cold fluids. Tubes, tubesheets and girth flanges are among the metal components that separate the fluids and are exposed to varying-temperature fluids in heat exchangers.
Large temperature differences between the hot and cold fluids can cause thermal distortion of these exposed components. Thermal distortion of girth flange-joint parts is one of the major causes of fluid leakages in shell-and-tube heat exchangers. There are two main categories of thermal shock, outlined below.
It becomes necessary to design girth-flange joint parts adequately, so that the impacts of these types of thermal shocks can be minimized during operation of heat exchangers. Design measures that can be adopted to alleviate these concerns are also discussed in this article.
Basis for analyzing thermal shock
The industry standard API 660 [ 1] describes the temperature limits that define when the effects of TD and TG should be considered in the mechanical design of girth flange joints and associated parts. It has been observed that sometimes user specifications also enforce temperature limits that can be more stringent than API 660 values. Temperature limits from API 660 are defined below for the example heat exchanger shown in Figure 1.
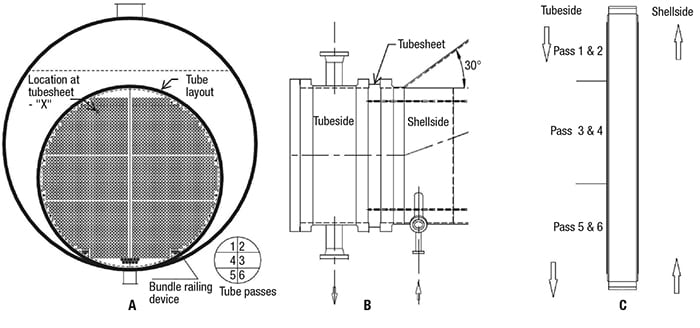
Figure 1. Determining the shellside and tubeside operating temperature at a particular location within the tubesheet is an essential part of analyzing the potential for thermal shocks in flange joint parts
The tubeside operating temperature at the inlet, outlet and location X on the tubesheet (a random location, as shown in Figure 1A) is denoted as Tts1, Tts2 and Tts–x The shellside operating temperature at the inlet, outlet and location X on the tubesheet is denoted as Tss1 , Tss2 and Tss–x
Engineers should consider an additional analysis in mechanical design of flange joint parts if the following is true:
ts1 ts2 ts–x ss–x
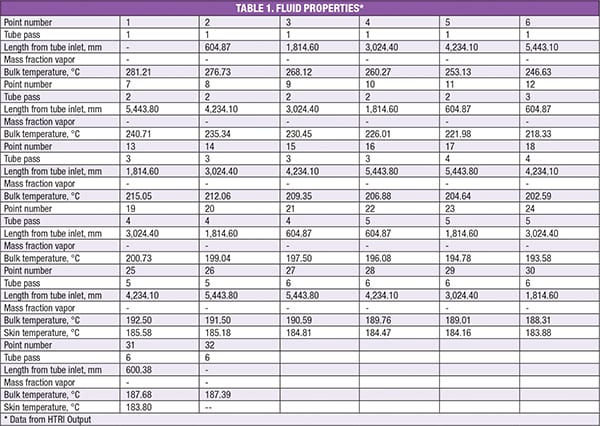
It is difficult to determine tubeside operating temperature at any random location ( X), so the use of the thermal rating functionality from a commercial heat-exchanger design software, such as that developed by HTRI (Heat Transfer Research Inc., Navasota, Tex.; www.htri.net), is recommended. One can easily determine pass-wise temperatures from this type of software output file (Table 1 is an example of such a file) and then determine TD across the tubesheet.
In multi-pass heat exchangers, the TD limit between the shellside and the tubeside can exceed the API value for one or more passes, resulting in local distortion of flange joints.
Designing flange joint parts
The method of analysis and additional requirements should be agreed upon with end users and vendors. Finite element analysis (FEA) can be one of the methods for this additional analysis to verify dimensions calculated using conventional design codes. However, the expertise of vendor and FEA report reviewers should be ascertained beforehand.
Flange rotation and flange bowing during equipment operation are the two major effects of thermal distortion on girth flange joints and their associated parts.
The primary function of flanges is to transmit the force from the bolts to the gasket and stop the separation of connected pressure parts. Flanges must be strong enough to bear this force without any damage and rigid enough to ensure that they do not excessively rotate across the face of gasket (Figure 2). High TD and TG tend to weaken the steel, so it is countered by decreasing the allowable stresses of parts, and adequate rigidity is ensured by lowering the allowable rigidity index.
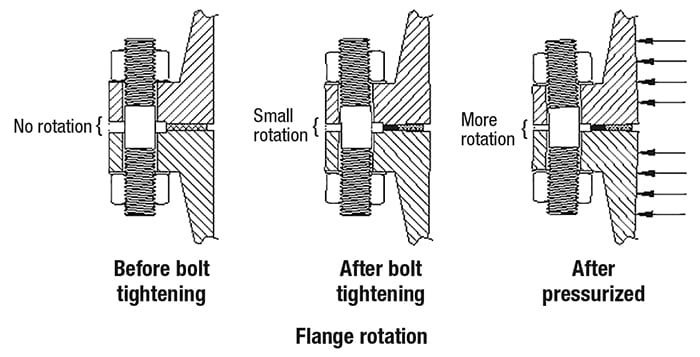
Figure 2. Flange rotation caused by thermal distortion can decrease the effectiveness of flange rigidity
The force required to compress the gasket, together with high bolt loads, can cause bowing of the flanges, resulting in uneven compression or even an opening midway between two bolts, as seen in Figure 3. Differential thermal expansion of flanges increases flange bowing and opening. This is mitigated by increasing the available bolt area and performing full bolt-load calculations.
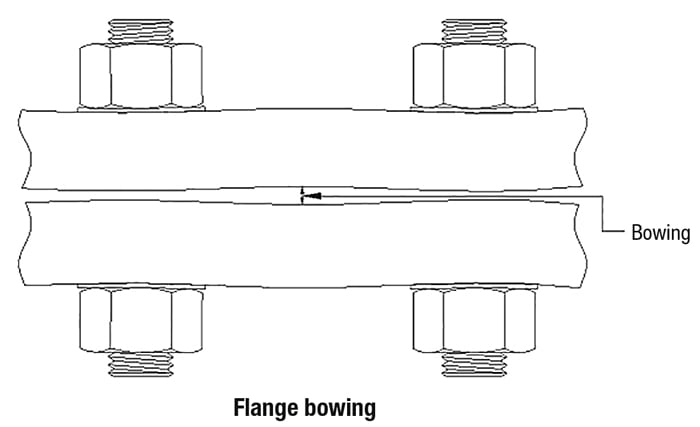
Figure 3. Flange bowing is a damaging phenomenon that results in uneven compression and even separation of bolts
The following are the measures that can be adopted as design enhancements to avoid the effects of thermal distortion on girth flange joints. These measures can be used for girth flanges, tubesheets and channel covers, as applicable.
- Reduce the allowable flange rigidity index to 0.70.
- Provided/required bolt area ratio should be 120% of design, and full bolt-load calculations should be performed
- Reduce allowable stresses for flanges and tubesheet to 80% of allowable, as per ASME Sec II Part D [2].
- Increase the required thickness (t) of the flanges and tubesheet by 5 mm, if t ≤ 100 mm; or by 10 mm, if t > 100 mm. Note that future machining allowance, as required by API 660 or user specifications, is separate from this extra thickness.
Apart from the above extra measures, target bolt and gasket stresses are determined as described in ASME PCC-1 Appendix O [ 3] and API 660.
Additionally, while performing calculations based on ASME PCC-1, engineers may consider reducing the maximum permissible bolt stress for the flange ( S fmax; as defined in Ref. 3) by a reduction factor S yo / S ya (ratio of flange yield strengths), irrespective of the criteria mentioned in WRC 538, Section 4 [ 4].
Thermal engineers should also be consulted to evaluate the potential for changing nozzle locations or interchanging the fluids on both sides, so that TD and TG can be fully eliminated from the system.
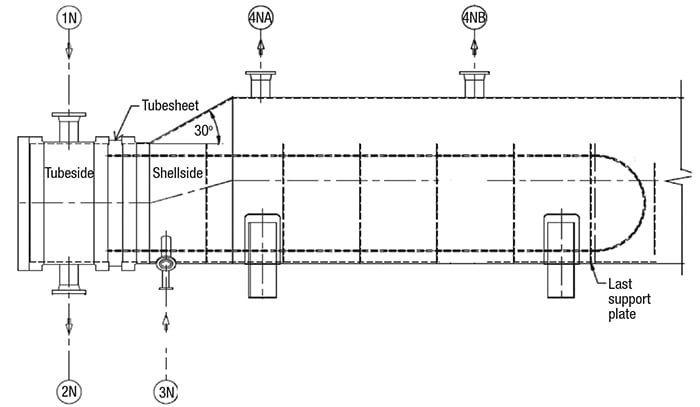
Figure 4. Software programs designed specifically for heat-exchanger rating are useful in evaluating TD and TG for multipass heat exchangers
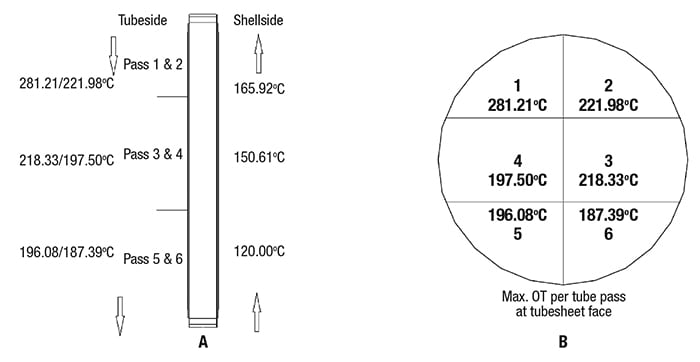
Figure 5. The operating temperatures across the heat exchanger passes can be used to determine if the flange joint parts may require additional analysis during mechanical design in order to mitigate the potential for thermal shocks
Evaluating thermal shock
The heat exchanger considered for the following examples is illustrated in Figures 4 and 5. This particular exchanger has six passes, and is of type AKU, as defined by the Tubular Exchanger Manufacturers Association (TEMA; Tarrytown, N.Y.; www.tema.org) [5]. For more information on TEMA exchanger types, please see Specifying Shell-and-Tube Heat Exchangers, Chem. Eng., May 2013, pp. 47–53. The operating temperatures for this exchanger are as follows (additional properties are shown in Table 1):
- Tubeside inlet (Tts1) = 281.21°C
- Tubeside outlet (Tts2) = 187.39°C
- Shellside inlet (Tss1) = 120.00°C
- Shellside outlet (Tss2) = 181.22°C
Determining TD and TG. Since the shellside vapor outlet connection is quite far from the tubesheet face and the shell inlet connection, it is assumed to have an average operating temperature of Tss3–4 at passes 3 and 4 and Tss1–2 at passes 1 and 2 for shellside fluid at the tubesheet face.
- Average temperature (Tss3–4) = (Tss1 + Tss2)/2 = 150.61°C
- Average temperature (Tss1–2) = (Tss3–4 + Tss2)/2 = 165.92°C
The temperature differential across the tubesheet is calculated as follows:
- At pass 1, TD = Tts – Tss1–2 = 281.21 – 165.92 = 115.29°C (Since this is greater than 110°C, additional mechanical analysis required for flange joint parts).
- At pass 2, TD = Tts – Tss1–2 = 221.98 – 165.92 = 56.06°C
(< 110°C) - Similarly, at passes 3–6, TD =
Tts – Tss (< 110°C)
It should be noted that the average of operating temperatures at the shellside, as assumed in this case, may not be applicable for other cases. Therefore, use of the shellside fluid temperature at designated locations must be carefully evaluated before being adopted into design calculations.
The temperature gradient around the channel-side flange components, including the tubesheet, is:
TG = Tts1 – Tts2 = 281.21 – 187.39 = 93.82 (< 110°C)
In the above example, the TD at pass 1 exceeds the API 660 limit, so additional analysis of the channel-tubesheet-shell flange joint is required. The use of these design augmentations, along with adherence to industry codes and standards and rigorous design software, will help to evaluate, and perhaps even eliminate, the potential for damaging thermal shocks and distortions in the critical internal components of shell-and-tube heat exchanges.
Edited by Mary Page Bailey
References
1. American Petroleum Institute, API Standard 660 — Shell-and-Tube Heat Exchangers, 9th ed., March 2015.
2. American Society of Mechanical Engineers (ASME) Boiler and Pressure Vessel Committee (BPVC), Subcommittee on Materials, ASME Section II, Part D — Allowable Stresses, 2017.
3. ASME, PCC-1 — Guidelines for Pressure Boundary Bolted Flange Joint Assembly, Appendix O, 2013.
4. Welding Research Council, WRC Bulletin 538 — Determination of Pressure Boundary Joint Assembly Bolt Loads, Section 4, p. 15, February 2014.
5. Tubular Exchanger Manufacturers Association (TEMA) Standards, 9th Ed., Nov. 2007.
6. ASME BPCV Section VIII, Div. 1 — Rules for Construction of Pressure Vessels, 2017.
7. Heat Transfer Research Inc. (HTRI) design software and documentation, www.htri.net.
Author
 Pankaj Kumar Singla is a mechanical design engineer for Fluor Daniel India Pvt. Ltd. (6th Floor, Infinity Tower B, Cyber City, DLF City Phase II, Gurgaon 122 002, Haryana, India; Email: [email protected]; Phone: +91-97164-14125). Singla has more than nine years of experience in the detailed engineering of static equipment in the pre-bid phase, as well as front-end engineering design (FEED) and detailed engineering for various oil-and-gas, petroleum refining and petrochemical industry projects. Prior to joining Fluor, Singla worked as a static equipment engineer for Daelim Industrial Co. (South Korea) and as a senior engineer at Valdel Engineers & Constructors (India). He holds a B. Tech. degree from the Giani Zail Singh College of Engineering & Technology in Bathinda, Punjab, India.
